
The Hypertext Transfer Protocol (HTTP) is the foundation of communication on the World Wide Web. It’s a protocol that enables communication between clients (such as web browsers) and servers (such as web servers). HTTP is a stateless protocol, which means that each request/response pair is independent of any previous request/response pair. This guide will take you through the journey of an HTTP request and response, from the initial request to the final response.
Before going to the process of how request and response works we need to understand few points which are important to know, if you already know about them still you can read it won’t take time :).
Get All The Design Tools You Need in One Place at Renderforest.com!
HTTP Request Methods
HTTP defines a number of request methods (also known as HTTP verbs) that are used to indicate the desired action to be performed on a resource. The most commonly used request methods are GET, POST, PUT, DELETE, and HEAD.
- GET: The GET method is used to retrieve a resource identified by a URL. A GET request should only retrieve data and should not modify the server state.
- POST: The POST method is used to submit an entity to a resource. A POST request can modify the server state, for example by adding a new resource or updating an existing one.
- PUT: The PUT method is used to update a resource identified by a URL. The entire entity should be replaced with the new entity provided in the request.
- DELETE: The DELETE method is used to delete a resource identified by a URL.
- HEAD: The HEAD method is similar to the GET method, but the server only sends back the response headers, not the response body. This is useful when a client wants to check if a resource has been modified without actually downloading the resource.
In addition to the basic HTTP request methods we’ve covered (GET, POST, PUT, DELETE,HEAD), there are several other HTTP request methods that are less commonly used but still important to know about:
- OPTIONS: This method returns information about the communication options available for a resource, such as the allowed request methods, headers, and authentication schemes. This can be useful for discovering information about an API or web service.
- PATCH: This method is used to partially update a resource, rather than replacing it entirely. It’s often used in RESTFul APIs to update specific fields of a resource without modifying the entire resource.
- CONNECT: This method establishes a network connection to a resource, typically for use with a proxy server.
- TRACE: This method returns a diagnostic trace of the request and response messages, which can be useful for debugging.
It’s worth noting that not all web servers and APIs support all of these HTTP methods, so you may need to check the documentation or contact the server administrator to determine which methods are supported.
HTTP Status Codes
HTTP defines a number of status codes that are used to indicate the status of an HTTP request/response pair. Status codes are divided into five categories:
- 1xx (Informational): This category indicates that the server has received the request and is continuing to process it.
- 2xx (Successful): This category indicates that the request was successfully received, understood, and accepted.
- 3xx (Redirection): This category indicates that the client must take additional action to complete the request.
- 4xx (Client Error): This category indicates that there was an error in the request, and the client must take corrective action.
- 5xx (Server Error): This category indicates that there was an error on the server side, and the server was unable to fulfill the request.
Here are some commonly used HTTP status codes:
- 200 OK: The request was successful, and the server has returned the requested data.
- 301 Moved Permanently: The requested resource has moved permanently to a new URL.
- 302 Found: The requested resource has moved temporarily to a new URL.
- 400 Bad Request: The server could not understand the request due to malformed syntax.
- 401 Unauthorized: The client must authenticate itself to get the requested response.
- 404 Not Found: The requested resource could not be found on the server.
- 500 Internal Server Error: The server encountered an unexpected condition that prevented it from fulfilling the request(a panic).
What is MIME Type
MIME (Multipurpose Internet Mail Extensions) type is a standardized way of identifying the type and format of a file or document on the internet. MIME types are used to specify the content type of a document or file, which helps web browsers and other software to interpret the file correctly.
MIME types are identified by a string of text known as a MIME type identifier or “content type”. This identifier consists of two parts: a type and a subtype, separated by a forward slash (/). For example, the MIME type for HTML documents is “text/html”. The type “text” indicates that the file contains textual information, while the subtype “html” specifies that the file is in HTML format.
MIME types are used by web servers to identify the content type of a file and send the appropriate headers to the client’s web browser. This information is then used by the browser to display the file correctly. For example, if the server sends a file with the MIME type “image/jpeg”, the browser knows that the file contains a JPEG image and can display it accordingly.
MIME types are also used in email messages to specify the format of email attachments. For example, a file attachment with the MIME type “application/pdf” would indicate that the file is a PDF document.
It’s important to use the correct MIME type when serving files over the internet, as this helps ensure that the files are interpreted and displayed correctly by web browsers and other software. If a file is sent with the wrong MIME type, it may be interpreted incorrectly or not at all, which can lead to confusion or errors for the user.
What is metadata
Metadata is data that provides information about other data. It describes the context, structure, content, or other attributes of a particular piece of data. Metadata is used to help users find, manage, and use data more effectively.
Let’s say you have a digital photo file. The photo itself is the data, but there is also metadata associated with the file that provides additional information about the photo. This metadata might include:
- The date and time the photo was taken
- The camera model and settings used to capture the photo
- The location where the photo was taken
- The name of the photographer
- The file format and file size
This metadata helps to provide context and information about the photo, which can be used to organize and manage large collections of photos more effectively.
For example, you could use the date and time metadata to sort your photos chronologically, or you could use the location metadata to group photos taken in the same place.
HTTP Headers
HTTP headers are used to provide additional information about an HTTP request or response. Headers are used to communicate various types of metadata, such as content type, content length, and caching instructions. Here are some commonly used HTTP headers:
Content-Type: This header is used to specify the MIME type of the data being sent in the request or response. For example, text/html or image/png.
Content-Length: This header is used to indicate the length of the content being sent in the request or response.
Cache-Control: This header is used to specify caching directives for the request or response. For example, max-age=3600 means that the response should be cached for one hour.
User-Agent: This header is used to identify the client making the request. For example, Mozilla/5.0 (Windows NT 10.0; Win64; x64) AppleWebKit/537.36 (KHTML, like Gecko) Chrome/58.0.3029.110 Safari/537.3.
Now let’s see the step by step journey of request and response:
STEP 1. Initiation of Request
When a user wants to access a web page, they enter a URL (Uniform Resource Locator) into their web browser. The URL includes the protocol (HTTP or HTTPS), the domain name or IP address of the server hosting the web page, and the path to the specific page or resource being requested.
When the user hits “enter,” the browser initiates an HTTP request to the server hosting the web page. The request includes a method (typically GET or POST), headers, and optional data (such as form data or query parameters) that are sent to the server.
STEP 2. DNS Resolution
Before the browser can send the HTTP request to the server, it needs to find the IP (Internet Protocol) address of the server hosting the web page. This is done through a process called DNS (Domain Name System) resolution.
The browser first checks its local cache to see if it already has the IP address for the domain name in the URL. If not, it sends a request to a DNS server to look up the IP address. The DNS server responds with the IP address, and the browser uses this to establish a connection with the server.
STEP 3. TCP Connection
Once the browser has the IP address for the server, it establishes a TCP (Transmission Control Protocol) connection with the server. TCP is a protocol that provides reliable, ordered, and error-checked delivery of data over a network.
The browser sends a SYN (synchronize) packet to the server, and the server responds with a SYN-ACK (synchronize-acknowledge) packet. The browser then sends an ACK (acknowledge) packet to confirm the connection has been established.
STEP 4. HTTP Request
With the TCP connection established, the browser sends the HTTP request to the server. The request includes the method (GET or POST), headers, and any optional data (such as form data or query parameters) that are sent to the server.
The server receives the request, and begins processing it.
STEP 5. Server Processing
When the server receives the HTTP request, it begins processing it. This typically involves retrieving the requested resource (such as a web page or image) from the server’s file system or database.
The server may also perform additional processing, such as executing server-side code (such as PHP or JavaScript), performing authentication or authorization checks, or interacting with other systems or services.
STEP 6. HTTP Response
Once the server has processed the request and retrieved the requested resource, it sends an HTTP response back to the browser. The response includes a status code (such as 200 OK or 404 Not Found), headers, and the content of the requested resource (such as a web page or image).
STEP 7. TCP Connection Release
After the HTTP response has been sent, the server closes the TCP connection, releasing the resources used by the connection. The client may choose to keep the TCP connection open for future requests, using a technique known as HTTP keep-alive.
Final. Client Processing
Finally, the browser receives the HTTP response and begins processing it. This typically involves rendering the content of the response (such as a web page or image) in the browser window.
The browser may also perform additional processing, such as executing client-side code (such as JavaScript), caching the response for future use, or interacting with other systems or services.
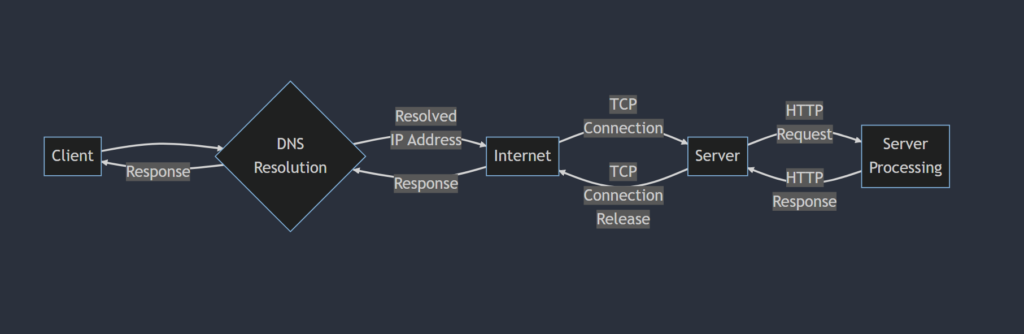
Flowchart of http request:
Example code
Below is some example code written in python:
1. Here’s an example of making an HTTP GET request in Python using the requests library:
import requests

response = requests.get('https://jsonplaceholder.typicode.com/todos/1')

print(response.status_code)  # 200
print(response.headers['Content-Type'])  # application/json; charset=utf-8
print(response.json(
))  # {'userId': 1, 'id': 1, 'title': 'delectus aut autem', 'completed': False}
In this example, we’re using the requests library to make an HTTP GET request to the JSONPlaceholder API. We’re requesting the resource at /todos/1, which returns information about a to-do item. The requests.get function returns a Response object, which contains information about the HTTP response. We can access the status code of the response using response.status_code, which returns 200 indicating that the request was successful. We can also access the content type of the response using response.headers[‘Content-Type’], which returns application/json; charset=utf-8, indicating that the response body is in JSON format. Finally, we can access the response body using response.json(), which returns a Python dictionary representing the JSON data.
2. Here’s an example of making an HTTP POST request in Python using the requests library:
import requests

payload = {'name': 'Testing User', 'email': 'example@example.com'}
response = requests.post('https://example.com/submit-form', data=payload)

print(response.status_code)  # 200
print(response.headers['Content-Type'])  # text/html; charset=UTF-8
print(response.text)  # 'Thanks for submitting the form!'
In this example, we’re using the requests library to make an HTTP POST request to the URL https://example.com/submit-form(it’s a non existing url) . We’re also sending some form data in the request body using the data parameter. The requests.post function returns a Response object, which contains information about the HTTP response. We can access the status code of the response using response.status_code, which returns 200 indicating that the request was successful. We can also access the content type of the response using response.headers[‘Content-Type’], which returns text/html; charset=UTF-8, indicating that the response body is in HTML format. Finally, we can access the response body using response.text, which returns the string ‘Thanks for submitting the form!’.
Finally, it’s important to be aware of some common security considerations when making HTTP requests. In particular, you should avoid sending sensitive data in the URL or in the request body without encryption, as this can be intercepted and read by attackers. You should also be careful when using third-party APIs or libraries, as they may have security vulnerabilities or unexpected behavior that can be exploited. It’s always a good idea to validate and sanitize user input to prevent attacks such as SQL injection or cross-site scripting (XSS). And if you’re building a public-facing API, you should consider implementing rate limiting, authentication, and other security measures to prevent abuse.
Conclusion
HTTP requests and responses are the foundation of communication on the World Wide Web. Understanding the journey of an HTTP request and response is essential for building web applications and APIs. This guide has covered the key steps in the journey of an HTTP request and response, including DNS resolution, TCP connection, HTTP request, server processing, HTTP response, TCP connection release, and client processing. We have also covered HTTP request methods, HTTP status codes, and HTTP headers. With this knowledge, you can start building powerful web applications and APIs that leverage the power of HTTP.
your comments are appreciated and if you wants to see your articles on this platform then please shoot a mail at this address kusingh@programmingeeksclub.com
Thanks for reading 🙂